Sep 29, 2023

Crafting Success: Craft Fair Checklist for Packing Essentials


Craft fairs are bustling events where creativity shines, and artisans share their unique creations with the world. Whether you're a seasoned craft fair vendor or just starting out, efficient packing and organization can make or break your experience. Enter the Craft Fair Checklist, a valuable tool that can transform your preparations from a chaotic rush to a smooth and stress-free process. In this blog post, we'll explore the numerous benefits of using a craft fair checklist to help you pack your essentials for the fair.

1. Systematic Packing

One of the primary advantages of using a craft fair checklist is the structure it provides. Instead of throwing items haphazardly into boxes or bags, a checklist ensures you pack systematically. You'll know exactly what you need and where to find it, saving you time and frustration when setting up your booth.

2. Ensures You Don't Forget Anything

Crafting and selling at a fair involves a multitude of items, from products and display materials to tools and marketing collateral. A checklist helps you account for everything you need, reducing the risk of leaving behind essential items that could negatively impact your sales or presentation.

3. Minimizes Overpacking

Craft fair vendors often find themselves lugging too much to the event, which can be exhausting and counterproductive. A well-organized checklist prevents overpacking by making you consider each item's necessity. You'll only bring what's essential, reducing the physical strain and potential booth clutter.

4. Saves Time and Energy

Efficiency is key when packing for a craft fair. With a checklist in hand, you can pack quickly and confidently, ensuring that you have everything you need without repeatedly checking or rummaging through your supplies. This time-saving aspect allows you to focus on other important aspects of your craft fair preparations.

5. Prevents Last-Minute Stress

Forgetting crucial items can lead to last-minute stress and panic. By using a craft fair checklist, you eliminate the fear of forgetting something important. This peace of mind lets you approach the fair with confidence and positivity, setting the stage for a successful event.

6. Easy Post-Event Cleanup

After a long day at a craft fair, the last thing you want to deal with is a messy and disorganized booth breakdown. Your craft fair checklist can also include a packing plan for teardown, ensuring that items are packed efficiently and securely for transport back home.

Craft fairs are incredible opportunities for artisans to showcase their talents and connect with a diverse audience. To make the most of these events, efficient packing and organization are essential. A Craft Fair Checklist is your secret weapon, ensuring that you pack your essentials with precision and ease. By systematically preparing for each event, you'll minimize stress, reduce the risk of forgetting items, and create a polished and professional booth that attracts customers and leaves a lasting impression. So, embrace the power of the craft fair checklist, and watch your craft fair experiences soar to new heights!

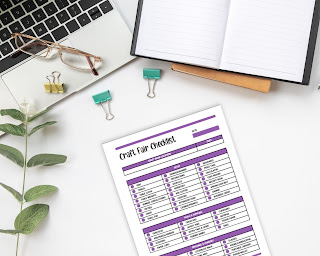
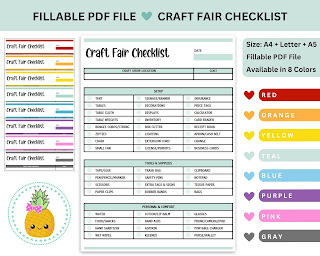
We created a fillable checklist to get you started!  You can type directly on the PDF file from any computer, fill it out on your iPad or print and hand write directly on the checklist.  The checklist comes in 3 beautiful colors, and 3 different sizes to meet your needs!


Happy Crafting!

Sep 22, 2023

Get Crafty this Holiday Season with DIY Decorations

Are you ready to add a personal touch to your holiday decor this year? DIY crafts are not only a fun way to get into the festive spirit but also a fantastic way to create unique, budget-friendly decorations. Whether you're decorating for Christmas, Hanukkah, or another holiday, here are three easy holiday DIY crafts with step-by-step instructions:

1. Festive Pinecone Ornaments:


Materials:
- Pinecones or Baby Coconuts
- Craft paint in holiday colors
- Twine or ribbon
- Glitter (optional)

**Instructions:**
1. Start by cleaning your pinecones/coconuts to remove any dirt or debris.
2. Paint the tips of the pinecones with your chosen holiday colors. You can go for classic red and green, elegant silver and gold, or any combination that suits your theme.
3. While the paint is still wet, sprinkle some glitter over the painted areas for a touch of sparkle.
4. Let the paint dry completely, usually for about 1-2 hours.
5. Attach a piece of twine or ribbon to the top of each pinecone/coconut for hanging.
6. Hang your pinecone ornaments on your tree or around your home for a rustic and charming holiday touch.

2. Handmade Holiday Cards or Tags:


Materials:
- Blank cards or cardstock
- Markers, colored pencils, or watercolor paints
- Stamps and ink pads
- Stickers, washi tape, or decorative paper
- Glue or double-sided tape

**Instructions:**
1. Fold your blank cards or cut your cardstock to the desired card size.
2. Let your creativity flow by decorating the front of each card with holiday-themed drawings, paintings, or stamped images.
3. Use stickers, washi tape, or decorative paper to add extra flair to your cards.
4. Write heartfelt messages inside your cards.
5. Allow the ink and decorations to dry, then send them to friends and family to spread holiday cheer.

3. Mason Jar Snow Globes:


Materials:
- Mason jars with lids
- Figurines or miniatures
- Craft glue or hot glue gun
- Water
- Glycerin (optional)
- Ribbon or Twine

**Instructions:**
1. Securely glue your chosen figurines or miniatures to the inside of the Mason jar lid. Let the glue dry completely.
2. Fill the Mason jar with water, leaving a small space at the top.
3. Add a pinch of glitter to the water. You can also include a drop of glycerin for a slower snowfall effect.
4. Carefully screw the lid with the figurines onto the jar, ensuring it's tightly sealed.
5. Turn the jar upside down, and watch the snowfall around your figurines.
6. Decorate the outside of the jar with ribbon or twine to make it extra festive.

These holiday DIY crafts are not only enjoyable to create but also make thoughtful gifts or decorations for your own home. Get crafting and make this holiday season extra special with your handmade touches! 🎄🎁✨ #DIYHolidayCrafts #HandmadeDecorations

Happy Crafting!

Sep 15, 2023

Craft Fair Success: Tips for Preparing and Thriving


Note: This post may contain affiliate links. As an Amazon Associate, I earn from qualifying purchases. 

Are you an artisan or a crafter looking to showcase your creations and connect with your community? Craft fairs are a fantastic opportunity to do just that! I've had so much fun over the years working these fairs and meeting amazing artisans!  These events bring together talented makers and enthusiastic buyers, creating a vibrant atmosphere filled with creativity and camaraderie. To ensure your craft fair experience is a success, here are some tips that I've found helpful for a successful event:

1. Select the Right Craft Fair:

Choosing the right craft fair is crucial. Research local events to check out the traffic, target audience, location  to ensure it aligns with the products you hope to sell.


2. Create Eye-Catching Displays:

Your booth's visual appeal can make a significant difference in attracting potential customers. Invest in a well-designed booth setup with attractive signage and clear price tags.  You can create eye catching signage using Canva and printing from home.  Make use of props and decorations that enhance your brand and products without overwhelming them.  

Choose displays that are compact and easy to pack and unload.  Oftentimes, you might be solo during your setup time, therefor you want to make unloading and loading as easy as possible for yourself.  I personally like these foldable shelves (#ad) - not only do they hold a lot of product, they maximize the booth space and easily fold for transport! 


Tip: To ensure a visually appealing display, practice your mock setup at home before your event.  This helps you become more efficient at assembling your booth, and allows you to troubleshoot potential issues in a low-stress environment.  When your craft fair day arrives, you'll be well-prepared, confident, and ready to showcase your booth in the best possible way! 


3. Stock Up on Inventory:

Ensure you have enough inventory to meet the demand. Craft fair attendees expect a variety of choices, so don't run out of your best-selling items halfway through the event. It's always better to have extra stock on hand.  


4. Price Your Items Wisely:

Pricing your products can be challenging, but it's essential to find a balance between covering your costs and appealing to your target market. Consider factors like material costs, labor, and competitor pricing when setting your prices.

5. Bring Essential Supplies:

Pack a toolkit with essentials like scissors, tape, spare price tags, and extra pens. It's also wise to have a cash float for making change and a secure way to store your earnings.  Don't forget to pack some food/snacks and water/beverage of choice!  I can't go without my Nespresso Coffee!! I made a handy checklist to make sure you don't forget all the essentials.  You can download the fillable PDF files from our website!

I created a checklist of the essential items I like to pack for a show. You can find the Editable PDF file on our website!


6. Promote Your Participation:

Let your audience know that you'll be at the craft fair! Utilize social media, email newsletters, and your website to announce your participation, share sneak peeks of your products, and build anticipation.

7. Engage with Attendees:

Engage with potential customers by being approachable and friendly. Be prepared to answer questions about your products, and consider offering demonstrations or interactive activities to draw people into your booth.

8. Accept Multiple Payment Options:

Make purchasing your products as easy as possible by accepting various payment methods, including cash, credit/debit cards, and mobile payment apps. This flexibility can increase your sales.

9. Bring Marketing Materials:

Hand out business cards, brochures, or flyers to attendees who express interest in your products. This way, they can reach out to you even after the craft fair is over.  You can also utilize your packaging materials with your logo and brand.  We use these organza bags for packaging some of our merchandise and include our business card in each one.

10. Follow Up After the Event:

After the craft fair, follow up with potential leads and customers by sending thank-you emails or offering special discounts. Building relationships and maintaining customer connections is essential for long-term success.


Participating in a craft fair can be a rewarding experience, both personally and professionally. By carefully preparing for the event, you can maximize your chances of success, showcase your creativity, and connect with a community of like-minded crafters and art enthusiasts. So, go ahead and put your crafting skills to work, and make your next craft fair a memorable and prosperous endeavor!

Happy Crafting!

Sep 14, 2023

10 Must Have Tech Tools for Crafting


Note: This post may contain affiliate links. As an Amazon Associate, I earn from qualifying purchases. 

In today's digital age, technology tools can enhance your crafting experience in so many ways.  Here are ten of my favorite must-have technology tools for crafting:

1. Computer or Tablet:  A computer or tablet is the primary tool for accessing design software, tutorials, and project inspiration. It's your gateway to the crafting world.  Are you PC or MAC?  

2. Design Software: Programs like Adobe Photoshop, Illustrator, or even free alternatives like Canva can help you create and customize designs for your crafting projects.  Canva has changed the world with their easy to use interface!  It also helps when you are designing to have a larger monitor, or a dual monitor setup.  Dell monitor's have been a favorite of mine for many years - they are durable and last long.

3. Digital Cutting Machine: Tools like the Cricut or Silhouette machines are invaluable for cutting intricate designs from various materials like paper, vinyl, fabric, and more.  I'm team Silhouette - but Cricut has dominated with their marketing efforts.

4. Printer: A high-quality printer is essential for printing templates, patterns, and digital designs onto various crafting materials.  I absolutely love Epson printers, and with the Ecotank, you don't have to break the bank on cartridge refills.

5. Camera or Smartphone: Capture your crafting process, document your projects, and share your work on social media or crafting blogs with a camera or smartphone with good photo capabilities.

6. Tablet Stand or Holder: When following digital tutorials or instructions, a tablet stand or holder keeps your device at an ergonomic angle, making it easier to follow along while crafting.

7. Digital Die-Cutting Files: Access to digital die-cutting files and SVGs (Scalable Vector Graphics) expands your crafting possibilities, allowing you to cut unique designs and shapes.

8. Digital Drawing Tablet: Ideal for digital illustration and hand-drawn designs, a drawing tablet allows you to create custom artwork for your crafting projects.

9. Crafting Apps: There are numerous crafting apps available for various purposes, from color matching to project planning and organization.

10. Online Crafting Communities: Joining online crafting communities, forums, and social media groups can connect you with fellow crafters, offer project ideas, and provide valuable support and advice.

These technology tools for crafting not only expand your creative capabilities but also make the crafting process more efficient and enjoyable. Whether you're a paper crafter, a DIY enthusiast, or a digital artist, integrating these tech tools into your crafting toolkit can take your projects to the next level.

You can also spruce up your design studio with these cool LED lights!  They are energy efficient, can set the mood for your creativity and has the longest lifespan of all the bulb options.

Crafting for Canines: Tail-Wagging DIY Projects

Note: This post may contain affiliate links. As an Amazon Associate, I earn from qualifying purchases. 

Crafting isn't just for humans; it's for our furry friends too! From handmade toys to stylish accessories, there's a world of creative possibilities when it comes to crafting for dogs. We'll explore some delightful DIY projects that will have tails wagging with excitement.

Crafty Canine Toys

* Braided Tug Toy - Grab some old t-shirts or fleece fabric scraps and braid them into a sturdy tug-of-war toy. Dogs love the texture, and you'll love how easy it is to make.

* Squeaky Plushies - Create adorable stuffed animals using dog-safe materials like felt or fabric. Don't forget to add a squeaker for that extra element of fun.

* Interactive Puzzle Toys - Craft puzzle toys from cardboard boxes or PVC pipes. Fill them with treats, and watch as your pup tries to figure out how to retrieve them.

Stylish Accessories


* Bandanas - Sew stylish dog bandanas in various colors and patterns. They're not only fashionable but also functional for keeping your pup cool on hot days.

* Collar Embellishments - Add a personal touch to your dog's collar with custom-made fabric flowers, bows, or even personalized name tags.

* Cozy Sweaters - Knit or crochet a cozy sweater to keep your furry friend warm during the colder months. Measure your dog's size for a perfect fit.

DIY Treats

* Homemade Dog Treats - Experiment with recipes for homemade dog treats. You can create a variety of flavors and shapes tailored to your dog's taste.

* Frozen Treats - Mix yogurt, peanut butter, and mashed banana, then freeze the mixture in silicone molds for refreshing, pup-approved summer treats.

Crafting with a Purpose

Crafting for dogs not only taps into your creativity but also strengthens the bond between you and your canine companion. 

So, gather your crafting supplies, enlist the help of your four-legged friend (or at least their enthusiastic supervision), and embark on a crafting adventure that will not only stimulate your creativity but also bring joy and comfort to your beloved canine companion. 

Happy Crafting!

Sep 7, 2023

The Art of Sewing: Unraveling the Threads of Creativity


Note: This post may contain affiliate links. As an Amazon Associate, I earn from qualifying purchases. 

In a world driven by technology and fast-paced living, there's something deeply satisfying and even therapeutic about slowing down, working with your hands, and creating something beautiful from scratch. Give me a few hours to play with my crafts and I'm happy!  One timeless craft that really enjoy, next to paper crafting and memory keeping is sewing. Whether you're a complete beginner or someone looking to rekindle their love for this art form, sewing offers numerous benefits that extend far beyond the final stitch. I hope this post inspires you to get started on your creative journey. 

The Art of Sewing

Sewing is a versatile and age-old craft that involves joining fabrics together using a needle and thread. From stitching up a tear in your favorite shirt to crafting intricate garments, quilts, and home décor items, sewing offers endless possibilities for creativity. While it may seem intimidating at first, anyone can learn to sew with practice and patience.


Benefits of Sewing

1. Creative Expression: Sewing provides a unique outlet for creative expression. You have the power to choose fabrics, colors, and patterns, allowing you to bring your vision to life. Whether you're making clothes, accessories, or home decor items, sewing lets you infuse your personality and style into your creations.

2. Mental Well-being: Engaging in sewing can have a calming and meditative effect. The repetitive and rhythmic nature of stitching can reduce stress, improve focus, and enhance your overall mental well-being. Many sewists find it therapeutic and a great way to unwind after a long day.

3. Sustainability: In a world increasingly concerned with environmental issues, sewing empowers you to make sustainable choices. You can repurpose old clothes, mend damaged items, or create your own eco-friendly fashion and home accessories, reducing your carbon footprint in the process.

4. Cost-Efficiency: Sewing can be cost-effective in the long run. Instead of constantly buying new clothes or home items, you can make your own, often at a fraction of the cost. Plus, you'll have the satisfaction of knowing you made it yourself.

5. Customization: Finding the perfect fit or design in ready-made items can be a challenge. Sewing allows you to tailor garments to your body shape and preferences. You can also make unique gifts for loved ones, adding that personal touch to every present.


Essential Sewing Tools for Beginners

Getting started with sewing requires a few essential tools and supplies. Here's a list to help you begin your sewing journey:

1. Sewing Machine: While you can start with hand sewing, a sewing machine will significantly speed up your projects. Look for a beginner-friendly, easy-to-use machine with basic features.

2. Needles and Thread: A variety of sewing needles, suitable for different fabrics, and a selection of high-quality threads in various colors are essential.

3. Fabric: Choose fabrics appropriate for your projects. Beginners may want to start with easy-to-sew materials like cotton.  If your project needs some stability, make sure you get the right stabilizer.

4. Scissors and Cutting Tools: Invest in a good pair of fabric scissors and rotary cutters for precise cutting.

5. Pins and Pin Cushion: These will help you hold fabric pieces together while sewing.

6. Measuring Tape: Essential for accurate measurements and sizing.

7. Iron and Ironing Board: Pressing seams and fabric before and after sewing is crucial for a professional finish.  An alternative to the bulky ironing board are Wool Pressing Mats that come in different sizes and give you nice crisp seams.

8. Pattern and Notions: If you're working from a pattern, make sure to have all the necessary notions such as buttons, zippers, and elastic.

9. Sewing Box: A container to organize and store your sewing tools is a handy addition.

Sewing is more than just a practical skill; it's a timeless art form that offers numerous benefits, from creative expression to mental well-being and sustainability. With the right tools and a willingness to learn, you can embark on a rewarding journey of self-expression and creation. So, gather your sewing supplies, choose your first project, and start stitching your way to a world of creativity and fulfillment.

Happy sewing!

Sep 6, 2023

Holiday Paper Crafting: DIY Lip Balm Tag


Note: This post may contain affiliate links. As an Amazon Associate, I earn from qualifying purchases. 

The holiday season is right around the corner - it's the perfect time to dust off your supplies and start getting creative to add that personal touch to your gifts this year! One delightful way to do this is by crafting your own lip balm tags. These tags not only add a festive flair to your lip balm gifts but also show your loved ones that you care. In this step-by-step tutorial, we'll guide you through the process of creating a charming holiday lip balm tag.

**Materials You'll Need:**
- Colored or patterned cardstock paper (holiday-themed is a bonus!)
- Scissors
- Ribbon or twine
- Lip balm containers
- Glue or double-sided tape
- Markers, stamps, or stickers for decorating
- Optional: holiday-themed embellishments (e.g., stickers, glitter, or small ornaments)

**Step 1: Prepare Your Materials**
Gather all your materials to ensure a smooth crafting process. Choose cardstock paper that matches the holiday theme you desire for your tags.  I used Kraft cardstock in this project.

**Step 2: Cut Out Tag Shapes**
Using your scissors, cut out tag shapes from the cardstock paper. The size of your tags should be large enough to accommodate your lip balm containers comfortably.  If you have a die cut machine like the Sizzix Big Shot, you can use tag dies like the My Favorite Things Tall Tag Duo to save time on cutting.

**Step 3: Personalize Your Tags**
Now, it's time to get creative! Decorate your tags using markers, stamps, stickers, or any other embellishments you have on hand.  Consider adding festive messages, holiday-themed images, or personal touches like the recipient's name.

**Step 4: Create a Hole for the Lip Balm**
Use a craft knife to create a hole in each tag to place your lip balm.  I love using the My Favorite Things die to cut out the lip balm window because it works perfectly with their Lip Balm Pouches that is adhered using double sided tape.  Place your lip balm inside the pouch and secure the window to your tag.

**Step 5: Add a Festive Ribbon or Twine**
Thread a ribbon or twine through the hole in the tag.  Here I used a striped ribbon with some twine to add a festive touch.

**Step 6: Final Touches**
Take a moment to ensure everything is secure and looks appealing.  Add any embellishments like stickers, glitter, or small ornaments to make your tags even more festive.  This cute polar bear is from MFT Bitty Bears stamp set.

**Step 7: Repeat for More Tags**
Repeat the above steps for as many lip balm tags as you need. You can create a variety of designs to suit different recipients and occasions.


**Share the Joy**
Creating your own holiday lip balm tags adds a personal and heartfelt touch to your gifts. It's a fun and creative way to spread joy during the holiday season. Plus, it shows your loved ones that you put thought and effort into their presents. Get crafting, and enjoy the smiles on the faces of those who receive your thoughtful gifts! Happy holidays and happy crafting!

Sep 5, 2023

The Ultimate Crafting Companion: We R Memory Keepers Crop-A-Dile Review


Note: This post may contain affiliate links. As an Amazon Associate, I earn from qualifying purchases. 

Crafting enthusiasts know that the right tools can make all the difference in bringing creative visions to life. One such tool that has gained a reputation for its versatility and convenience is the We R Makers (aka We R Memory Keepers) Crop-A-Dile. I have owned my crop-a-dile for over 12 years!  I'll dive into a detailed review of the Crop-A-Dile and explain why it's my favorite tool for crafting!  

The We R Makers Crop-A-Dile is a compact and powerful tool designed to punch holes, set eyelets, and even snap metal snaps with ease. Its versatility is one of its standout features, making it an essential tool for various crafting projects, from scrapbooking to card making and beyond.

Key Features

Here are some of the key features that make the Crop-A-Dile a must-have for crafters:

1. Dual-Purpose Tool: The Crop-A-Dile is not just a hole puncher; it's also an eyelet setter. With two different hole sizes (1/8-inch and 3/16-inch), you can create holes in various materials, including paper, chipboard, leather, fabric, and even thin metal.

2. Eyelet Setting: Setting eyelets can be a finicky process, but not with the Crop-A-Dile. It effortlessly punches the hole and sets the eyelet in one smooth motion, ensuring a secure and professional finish.

3. Quiet Operation: Unlike traditional hole punchers, the Crop-A-Dile operates quietly, making it a great choice for crafting late at night or in shared spaces.

4. Adjustable Hole Punching: The Crop-A-Dile features an adjustable measurement guide that allows you to precisely space holes in your projects, ensuring perfect alignment every time.

5. Easy-to-Use: Its ergonomic design and comfortable grip make it easy to handle, even for extended crafting sessions. The built-in storage compartment keeps eyelets and snaps organized and easily accessible.

6. Durability: I appreciate the Crop-A-Dile's sturdy construction, as it's built to withstand heavy use and last for years...mine is going on 12+!

Crafting with the Crop-A-Dile


Let's take a closer look at how the Crop-A-Dile can be used in various crafting scenarios:

1. Scrapbooking: Create custom scrapbook pages with neatly punched holes for binding or decorative eyelets to add flair to your layouts.

2. Card Making: Add eye-catching eyelets to your handmade cards for a polished look, or use the Crop-A-Dile to punch holes for ribbon or twine embellishments.

3. Leatherwork: Whether you're making leather journals, keychains, or wallets, the Crop-A-Dile can handle leather materials effortlessly.

4. Clothing and Accessories: Use it to set snaps on fabric projects like clothing, bags, or home decor items.

5. Home Decor: Add hanging hardware to home decor pieces such as picture frames or wall art.

This is my all-time favorite tool! I use it in my paper craft projects, sewing projects, memory keeping and journaling projects.  Its ability to punch holes, set eyelets, and snap metal snaps makes it an invaluable asset for a wide range of crafting projects. Whether you're a seasoned crafter or just starting your creative journey, the Crop-A-Dile will quickly become your go-to tool for adding that professional touch to your creations. 

Tell me what your favorite craft tool is that you can't live without!

Happy Crafting!

Sep 4, 2023

Sublimation on Cups: Personalize Your Sips with Style


Note: This post may contain affiliate links. As an Amazon Associate, I earn from qualifying purchases. 

In the world of personalized gifts and custom merchandise, sublimation printing on cups has emerged as a popular and creative way to add a personal touch to your drinkware. Whether you're a business owner looking to offer unique merchandise or an individual looking for a special gift, sublimation on cups is a versatile and visually appealing option. In this blog post, we'll explore the fascinating world of sublimation printing on cups and discover why it's becoming the go-to choice for customization.

What is Sublimation Printing?

Sublimation printing is a heat-based transfer process that allows vibrant, full-color designs and images to be permanently infused into various materials, including ceramics, polyester fabrics, and specially coated surfaces. The key to sublimation's magic lies in its ability to transform a design from a solid to a gas state without passing through a liquid stage, ensuring a high-quality, durable print that won't fade or peel.

The Cup as a Canvas


Cups, mugs, and tumblers have become popular canvases for sublimation printing due to their widespread use and the limitless possibilities they offer for customization. Here are some reasons why sublimation on cups is gaining momentum:

1. Endless Design Options: Sublimation allows for intricate and detailed designs, including photographs, illustrations, logos, and text. You can create personalized cups for any occasion, from weddings and birthdays to corporate events and promotional giveaways.

2. Vibrant and Durable Prints: Sublimated designs become part of the cup's surface, resulting in sharp, vivid, and long-lasting prints. The colors won't fade or scratch off, even after multiple uses and washes.

3. Versatile Material Compatibility: Sublimation works exceptionally well on ceramics, porcelain, and coated polymer cups. This versatility means you can choose the cup material that best suits your needs and budget.

4. High-Quality Photo Reproduction: Sublimation is ideal for transferring high-resolution photos onto cups. It captures the nuances of colors and details with precision, making it perfect for treasured memories and gifts.

5. Personalized Gifts: Customized cups make thoughtful gifts for loved ones. You can add a personal touch with someone's name, a heartfelt message, or a cherished photo, turning a simple cup into a cherished keepsake.

6. Branding and Marketing: Businesses can use sublimated cups as promotional items, enhancing brand visibility and leaving a lasting impression on clients and customers. Custom cups are also excellent additions to merchandise offerings.

How the Process Works

Sublimation on cups involves several steps:

1. Design Creation: Start by designing or selecting the artwork you want to print on the cup. Make sure it fits the cup's dimensions and that the colors are vibrant and eye-catching.  You can find many designs on Etsy!

2. Printing: Using sublimation ink, print the design onto sublimation transfer paper. Ensure the design is mirrored or flipped horizontally as it will be transferred in reverse. 

3. Heat Press Transfer: Secure the sublimation transfer paper onto the cup using heat-resistant tape. Place the cup in a specialized heat press machine, which applies heat and pressure to transfer the design onto the cup.  I personally use this heat press:

4. Cooling and Quality Check: Allow the cup to cool, peel off the transfer paper, and inspect the print for quality and adherence. You'll be amazed at how the design fuses seamlessly with the cup's surface.

5. Final Touches: Clean the cup, ensuring it's free from any residual ink or adhesive. Your custom sublimated cup is now ready to be enjoyed or gifted.

I especially love the look of sublimation on frosted beer glasses, along with the skinny tumblers for keeping my drinks cool in the hot Hawaii sun!  I've found my blanks here.

Sublimation printing on cups is a versatile and visually appealing way to personalize your drinkware, commemorate special moments, and promote your brand. With its vibrant and durable prints, endless design options, and compatibility with various materials, sublimation has become a go-to choice for those looking to add a personal touch to their sips. Whether you're an individual creating a unique gift or a business owner seeking promotional merchandise, sublimation on cups offers endless possibilities for creativity and customization. So, raise your personalized cup and enjoy a sip of creativity and style!

Happy Crafting!

Favorite Paper Crafting Tools


Note: This post may contain affiliate links. As an Amazon Associate, I earn from qualifying purchases. 

Paper crafting is a versatile and captivating form of crafting, offering endless possibilities for creativity. While the act of crafting itself is rewarding, having the right tools can elevate your paper crafting experience to new heights. Here are some of my favorite paper crafting tools that can enhance your projects and make the creative process even more enjoyable:

1. Precision Cutting Tools: A reliable and sharp paper trimmer is essential for achieving clean, straight cuts in paper. Craft knives and cutting mats are also handy for intricate cutting and precise trimming.

2. Scissors: High-quality scissors are a must-have for paper crafting. They should be comfortable to hold and capable of cutting through various paper weights with ease. Detail scissors with fine points are perfect for intricate cuts, or fussy cutting.

3. Adhesives: Choose from an array of adhesive options, such as double-sided tape, glue sticks, liquid glue, and foam tape. The right adhesive ensures that your paper elements stay securely in place while maintaining a polished look.

4. Paper Punches: Paper punches come in a wide range of shapes and sizes, allowing you to create consistent and intricate shapes effortlessly. They are excellent for making embellishments and decorative elements.

5. Stamping Supplies: Stamps, ink pads, and markers open up a world of possibilities for adding designs, patterns, and sentiments to your paper projects. Experiment with different colors and stamping techniques to personalize your creations.

6. Scoring Board: Scoring boards are invaluable for creating precise and neat folds in paper, essential for making cards, envelopes, and 3D paper structures like boxes and bags.

7. Decorative Papers: Stock up on a variety of decorative papers, including patterned paper, cardstock, vellum, and specialty papers. These materials provide the foundation for your paper crafting projects.  As a standard base, my all-time favorite cardstock to use is the Neenah White 110lb Cardstock.  It's perfect to stamp on and the weight (gsm) of the paper is sturdy.

8. Embellishments: Sequins, buttons, rhinestones, and ribbon can add flair and sparkle to your paper crafts. These embellishments allow you to customize your projects and make them uniquely yours.

9. Crafting Brushes and Blending Tools: If you're into techniques like ink blending and distressing, soft-bristle brushes and blending tools are essential for achieving smooth and gradient effects.

10. Die-Cutting Machine: Die-cutting machines are a game-changer for paper crafting. They allow you to cut intricate shapes, letters, and designs quickly and consistently using metal dies or electronic files.

11. Storage Solutions: Organizational tools such as paper racks, storage boxes, and drawer units can help keep your paper crafting supplies tidy and easily accessible. An organized crafting space can boost your creativity and productivity.

12. Bone Folder: A bone folder is a simple yet invaluable tool for creating crisp, professional-looking creases and folds in paper.

13. Heat Gun: Essential for heat embossing and drying inks, a heat gun is a versatile tool in paper crafting.

14. Crafting Mat: A self-healing cutting mat protects your work surface and prolongs the life of your cutting tools while providing accurate measurements and guides.

These favorite paper crafting tools not only make the creative process smoother but also enhance the quality of your finished projects. Remember that while having the right tools is important, the most vital ingredient in crafting is your creativity and imagination. So, gather your tools, explore new techniques, and let your paper crafting projects come to life. Happy crafting!

Crafting Success: Craft Fair Checklist for Packing Essentials

Craft fairs are bustling events where creativity shines, and artisans share their unique creations with the world. Whether you're a seas...